
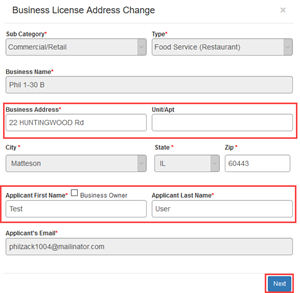
Address Change
After selecting “Address Change” a pop-up will occur with the following form. Only the address, Applicant Name and Business Owner checkbox can be updated on this form.
- Select Next (this will save your application, but it is not complete).
-
Review each step in the application screen – Based upon the type of license(s) offered by the municipality, these steps may vary. To complete this section, follow the steps listed on the left-hand side of the screen, starting with Step 1, concluding with the last step
An example:
|
Color denotes the type of action required:
|
-
Once complete (including mandatory fields marked by a red * asterisk), you are able to submit payment to complete the process.
-
At the bottom of the form you are presented with three options:
-
Print – This option will allow you to print an invoice after payment has been received
-
Submit – This option will allow you to submit the changes for the Address Change on your application. Once selecting this option, the application will be submitted to the municipality.
-
Save – This option allows you to save the application and come back to it at a later date.

-
-
You can view the invoice
-
For details regarding viewing your invoice please see the “See Invoices” section of the documentation.
-
Please note: options presented during application may be different from documentation. This is due to differences in how your municipality has set up their forms.
Owner Change
After selecting “Owner Change” a pop-up will occur with the following form. Only the Applicant Name and Business Owner checkbox can be updated on this form.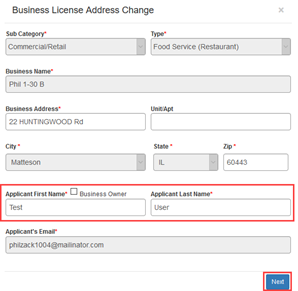
-
Select Next (this will save your application, but it is not complete).
-
Review each step in the application screen – Based upon the type of license(s) offered by the municipality, these steps may vary. To complete this section, follow the steps listed on the left-hand side of the screen, starting with Step 1, concluding with the last step.
An example: Color denotes the type of action required:
-
Green – All mandatory information is filled out, please verify and edit for accuracy.
-
Orange – There are mandatory fields that need to be completed before the application can be submitted.
-
Gray – No further action is required. However, should be reviewed to add supplemental information.
-
-
Once complete (including mandatory fields marked by a red * asterisk), you are able to submit payment to complete the process.
-
At the bottom of the form you are presented with three options
-
Print – This option will allow you to print an invoice after payment has been received
-
Pay and Submit – This option will allow you to submit payment for the application. Once selecting this option, the application will be submitted to the municipality.
-
Save – This option allows you to save the application and come back to it at a later date.
-
For details regarding submitting payment please see “Processing a Payment” in Universal Concepts section of the documentation.
-
-
You can now view the invoice
-
For details regarding viewing your invoice please see the “See Invoices” section of the documentation.
-
Please note: options presented during application may be different from documentation. This is due to differences in how your municipality has set up their forms.
Business Name Change
After selecting “Business Name Change” a pop-up will occur with the following form. Only the Business Name, Applicant Name, and Business Owner checkbox can be updated on this form
-
Select Next (this will save your application, but it is not complete).
-
Review each step in the application screen – Based upon the type of license(s) offered by the municipality, these steps may vary. To complete this section, follow the steps listed on the left-hand side of the screen, starting with Step 1, concluding with the last step.
An example: Color denotes the type of action required:
-
Green – All mandatory information is filled out, please verify and edit for accuracy.
-
Orange – There are mandatory fields that need to be completed before the application can be submitted.
-
Gray – No further action is required. However, should be reviewed to add supplemental information.
-
-
Once complete (including mandatory fields marked by a red * asterisk), you are able to submit payment to complete the process.
-
At the bottom of the form you are presented with three options
-
Print – This option will allow you to print an invoice after payment has been received
-
Pay and Submit – This option will allow you to submit payment for the application. Once selecting this option, the application will be submitted to the municipality.
-
Save – This option allows you to save the application and come back to it at a later date.
-
For details regarding submitting payment please see “Processing a Payment” in Universal Concepts section of the documentation.
-
-
You can now view the invoice
-
For details regarding viewing your invoice please see the “See Invoices” section of the documentation.
-
Please note: options presented during application may be different from documentation. This is due to differences in how your municipality has set up their forms.